Sunday, February 23, 2020

This week's cards

Hello and welcome back! This week started out happy, with news that my niece gave birth to a darling baby boy, but quickly turned sad when I learned of the passing of two friends' parents and a long-time member of my church. The new baby card will wait until I finish the framed art piece I'm making, but I'm sharing the sympathy cards today, along with a birthday card I made for my husband's aunt.

First, the birthday card:


This particular aunt has been a prolific artist in her own right, creating oil paintings for just about everyone in the family. She has moved on to watercolors and does beautiful work. I wanted to make something that honors her artistic talent, and the My Meadow stamp set allowed me to created something that looks like watercolor without all the work!


I even decorated the envelope.


Yesterday, I spent the afternoon making sympathy cards. Not my favorite way to spend the day, but unfortunately necessary.


This card was inspired by a sample in the January - June 2020 Catalog. The sample is a treat bag, but I used a retired background stamp as a substitute for the bag. It's stamped with Versamark and embossed in copper, but it's hard to see in the photo. I did a watercolor wash on Shimmery White cardstock before die cutting the pieces for the flower (except for the poppy outline and the flower center).


This card was inspired by a sample in the 2018-2019 Annual Catalog. The catalog sample was a small square card, but I used the entire panel of retired Graceful Glass Vellum to create the card front. It's colored with Stampin' Blends. I also added the die cut on the side and wove retired Certainly Celery Grosgrain ribbon through it for an added accent. The butterfly on the envelope was also colored with Stampin' Blends. I put a piece of cardstock inside the envelope before coloring to prevent bleed-through from the markers.

That's it for today. I'm getting ready to start on my March birthday and anniversary cards after sending the last of my February cards this morning. Total for the month includes 22 birthday cards, 3 anniversary, 3 get well, 4 sympathy, and 20 Valentines for my co-workers. March will be even busier!

Thanks for stopping by, and have a great day!

--Cindi


Supplies used (all Stampin' Up!):

Birthday card --
Stamp set - My Meadow
Paper - Whisper White, Basic Gray, Pool Party, and Crumb Cake cardstock
Ink - Early Espresso, Soft Suede, Crumb Cake, Granny Apple Green, Basic Gray, Real Red, and Pool Party
Tools - Stampin' Dimensionals, SNAIL

Poppy sympathy card --
Stamp set - Peaceful Moments, Pretty Pattern (retired)
Paper - Whisper White Thick Cardstock; Whisper White, Shimmery White, Crushed Curry, Basic Black, and Poppy Parade cardstock
Ink - Poppy Parade and Old Olive
Tools - Big Shot, Poppy Moments dies, Stitched So Sweetly dies, Aqua Painter, 3/8" Circle Punch, Heat Tool, Copper Embossing Powder, Multi-purpose Liquid Glue, SNAIL, Stampin' Dimensionals, Mini Stampin' Dimensionals

Stained glass sympathy card --
Stamp set - Painted Glass
Paper - So Saffron, Basic Black, and Whisper White cardstock, Graceful Glass Designer Vellum (retired)
Ink - Memento Tuxedo Black
Coloring Tools - Stampin' Blends: Pumpkin Pie Light and Dark, Night of Navy Light and Dark, Balmy Blue Light and Dark, Flirty Flamingo Light and Dark, Old Olive Light and Dark, Daffodil Delight Light
Accessories - Certainly Celery 5/8" Grosgrain Ribbon (retired)
Tools - Big Shot, Stained Glass dies, SNAIL, Stampin' Dimensionals, Mini Glue Dots

Friday, February 14, 2020

Some Special Birthday Cards

Hello and welcome back! I've been doing a pretty good job of keeping up with cards so far in #imbringingbirthdaysback. In my last post I showed you the cards I'm sending for February, but there were a couple of birthdays that I wanted to do something special for, so here's what I made:


One of my high school friends is a beekeeper, so I CASEd this card from the current Sale-A-Bration brochure. I'm so thankful that Stampin' Up! provides us with "recipes" for the samples in the catalogs. I didn't change anything in this card, just copied it straight from the book. A handy tip: for the "honeycomb," I adhered the cardstock to a piece of a multi-purpose adhesive sheet before die cutting. It's much easier and neater than trying to use glue on such a finely detailed piece.

Another one of my friends is turning "eligible for Medicare" this month, so that called for a special card too. She and her husband have the most beautiful gardens in the spring and summer, so I thought this would be appropriate.


This card is CASEd from the January-June Mini Catalog, but I did make a couple of changes. I didn't have the embossing folder used in the sample, so I had to substitute another. Also, it's hard to see the white ink that was sponged onto the background, but it's there. I did a watercolor wash on the sentiment piece instead of sponging like the sample. I tried sponging on a piece of cardstock but it wasn't turning out the way I'd hoped.

I've got 5 more cards to get out this month; then I'll have to start on my cards for March. Hoping to be able to keep this up!

Thanks for stopping by, and have a great day!

--Cindi


Supplies used (all Stampin' Up!):

Bee card --
Stamp set - Honey Bee
Paper - Highland Heather and Whisper White cardstock, Golden Honey Bee Specialty DSP
Ink - Memento Tuxedo Black
Coloring Tools - Highland Heather, Purple Posy, Calypso Coral, Poppy Parade, and Mango Melody Stampin' Blends
Accessories - Whisper White Bakers Twine
Tools - Big Shot, Detailed Bee Dies, Stitched Shapes Framelits, Multi-purpose Adhesive Sheets, Stampin' Dimensionals, Multi-purpose Liquid Glue, Mini Glue Dots

Garden Gate card --
Stamp set - Grace's Garden
Paper - Whisper White Thick Cardstock; Sahara Sand, Whisper White, Granny Apple Green, and Shimmery White Cardstock
Ink - Memento Tuxedo Black, Whisper White Craft Ink, Gorgeous Grape, Highland Heather, and Sahara Sand Classic Ink
Coloring Tools - Rococo Rose, Granny Apple Green, Petal Pink, Highland Heather, Purple Posy, and So Saffron Stampin' Blends
Tools - Big Shot, Subtle Embossing Folder, Garden Gateway Dies, Stampin' Dimensionals, Fine-Tip Liquid Glue, Aqua Painters, SNAIL

Tuesday, February 4, 2020

Birthday Club

Hello and welcome back! Last week I held the first classes I've had in a while. I'm trying to start a "Birthday Club," basically, a monthly class for participants to make 8 cards to send off to their family and friends. It's part of #imbringingbirthdaysback, and I'm hoping to use it to kickstart my business.

Anyhoo, these are the cards we made for January. I've made extras to send out to my February birthday card recipients, along with a variation for anniversaries.


I decided to use up some of my large stash of retired products for these cards. This one uses Rose Red ink & cardstock and Regal Rose cardstock along with some Rose Red DSP, and the retired Starburst Framelits and Elegant Bouquet embossing folder. We made a variation of this card where the embossed layer was turned 180 degrees and the sentiment circle was placed at the top.


This card uses the retired Tranquil Tide cardstock & ink, Share What You Love specialty DSP, and Powder Pink ribbon. The stamp and die are current from the 2019-2020 Annual Catalog.


This card is a variation of one I made for a challenge last year. It uses the Botanical Butterfly DSP and the Gingham Gala ribbon from earlier Sale-A-Brations. Instructions can be found HERE.


This card was inspired by a sample in the 2019-2020 Annual Catalog. All products are current except the Mint Macaron ribbon and Thick White Bakers Twine, but there are similar products in the catalog that could be substituted. 


And this is the variation of the second card above to be used for anniversaries. I just changed up the paper and ribbon and added the "Happy Anniversary" sentiment inside. I love this paper with its shiny bits. You can sort of see it in the second picture.

My first cards for February went into the mail today, so if you're on my list and have a birthday coming up, one of these may show up in your mailbox!

Thanks for stopping by, and have a great day!

--Cindi


Supplies used (all Stampin' Up!):

Rose Red birthday card --
Stamp set - Perennial Birthday
Paper - Whisper White Thick Cardstock; Rose Red, Regal Rose, Whisper White cardstock, Rose Red DSP
Ink - Rose Red
Tools - Big Shot, Elegant Bouquet embossing folder, Starburst Framelits, Starburst punch, Layering Circles Framelits, Multi-purpose glue, Stampin' Dimensionals

Special Day card --
Stamp set - Stitched All Around
Paper - Tranquil Tide & Whisper White cardstock, Share What You Love DSP
Ink - Tranquil Tide
Accessories - Powder Pink ribbon, Basic Rhinestones
Tools - Big Shot, Stitched Labels dies, Multi-purpose glue, Stampin' Dimensionals

Butterfly card --
Stamp set - sentiment from special Paper Pumpkin kit (but you could substitute one from Special Celebrations - we used one for the inside sentiment)
Paper - Basic Black & Whisper White cardstock, Botanical Butterfly DSP
Ink - Memento Tuxedo Black
Accessories - Gingham Gala organza ribbon
Tools - Banner Triple punch, Multi-purpose glue, Stampin' Dimensionals

Pop of Petals card --
Stamp sets - Pop of Petals, Here's A Card
Paper - So Saffron, Mint Macaron, Soft Sea Foam & Petal Pink cardstock; Whisper White Thick cardstock
Ink - Old Olive, Calypso Coral
Accessories - Mint Macaron ribbon, Thick White Bakers Twine
Tools - Big Shot, Basketweave embossing folder, Story Label punch, 4-petal Flower punch, Multi=purpose glue, Stampin' Dimensionals

Wednesday, December 4, 2019

Catching Up With Cards!

Hello and welcome back! Again, I've fallen off the wagon and haven't sent many cards over the past several months. However, I have made a few. Let me show them to you!

First up, a card for our neighbors who had a baby in October:


I used the Layering Squares framelits to cut out the colored and white squares, then used different embossing folders to add texture to the white squares. The background was also embossed and the die-cut word and bakers twine bow were added.

Next up, a birthday card for the choir director at my church:


I especially like the sophisticated look of this card. The flocked designer paper and custom envelope, along with the satin bow, are very elegant.

I also made a few cards for some church friends who are homebound:


This was pretty simple, with minimal stamping and just a bit of coloring with Stampin' Blends. I love the layers!

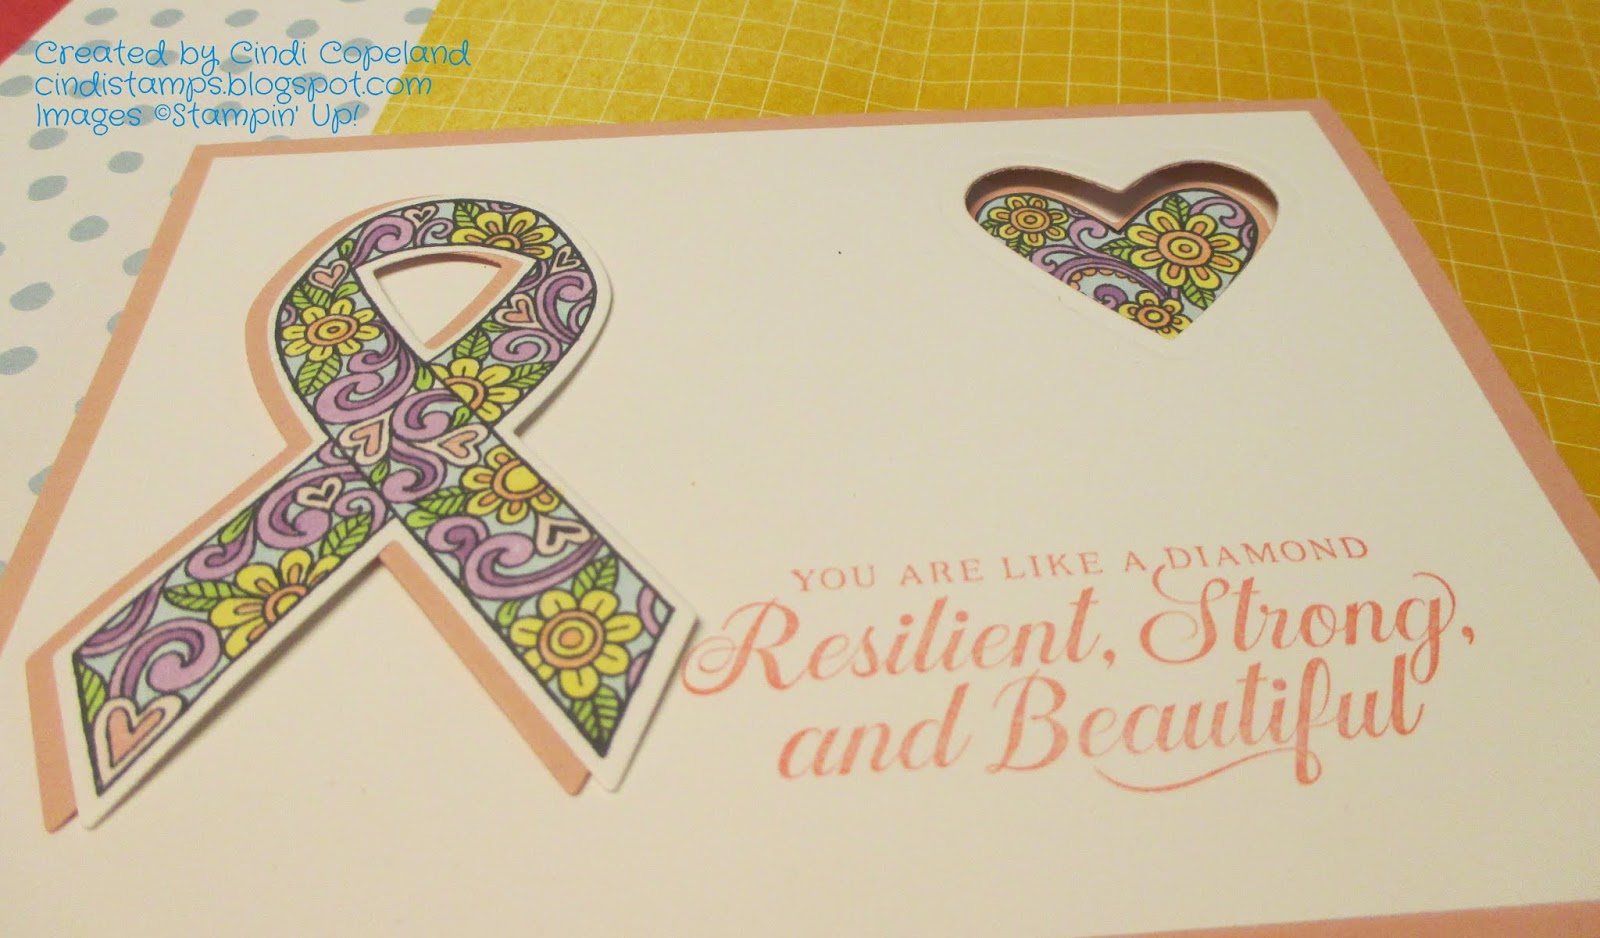
Finally, a card for a friend who was just diagnosed with breast cancer:


 I used Stampin' Blends to color in the floral design on the ribbon, then layered it with another ribbon cut from Blushing Bride and popped it onto the card front with dimensionals. I also made a second card to add to my stash and had the idea to cut a heart in the upper right corner to show a heart inside the card. 


Unfortunately, the idea didn't come until after I had assembled the front of the card. When I ran it through the Big Shot to cut the heart, my well-used cutting pads left impressions on the card and the die cut. I'm hoping that they will relax a bit and I'll be able to use the card in the future. I like the look of it.

Well, now I've got to start thinking about Christmas cards. I've decided to up my game this year and have added about 20 names to my existing list of 80. Time to get cracking!

Thanks for stopping by, and have a great day!

--Cindi


Supplies used (all Stampin' Up!):

Baby card -
Stamp set - Moon Baby (retired)
Paper - Whisper White, So Saffron, Blushing Bride, Balmy Blue, and Soft Sea Foam cardstock; Whisper White Thick Cardstock
Ink - Soft Sea Foam
Accessories - Crushed Curry Bakers Twine (retired)
Tools - Big Shot (retired), Well Written Thinlits, Layering Squares Framelits, Tufted embossing folder, Basketweave embossing folder, Perfect Polka Dots embossing folder (retired), Quilt Top embossing folder (retired), Simple Stripes embossing folder (retired), Stampin' Dimensionals, Mini Glue Dots, Multipurpose Adhesive Sheets

Birthday card -
Stamp set - All About Everything (Paper Pumpkin retired set)
Paper - Very Vanilla and Basic Black Cardstock, Very Vanilla Thick Cardstock, Mocha Morning Specialty DSP (retired)
Ink - Memento Tuxedo Black
Accessories - Basic Black 5/8" satin ribbon (retired)
Tools - Envelope Punch Board (retired), Big Shot (retired), Stitched Nested Labels dies, Stampin' Dimensionals, Multipurpose Liquid Glue, Mini Glue Dots, SNAIL

Thinking of you card -
Stamp set - Good Morning Magnolia
Paper - Early Espresso, Petal Pink, and Whisper White Cardstock, Magnolia Lane DSP
Coloring Tools - Memento Tuxedo Black Ink; Petal Pink and Mossy Meadow Stampin' Blends
Tools - SNAIL 

Ribbon card --
Stamp sets - Ribbon of Courage (retired), Strong and Beautiful
Paper - Blushing Bride and Whisper White Cardstock
Coloring Tools - Memento Tuxedo Black and Flirty Flamingo ink; Balmy Blue, Daffodil Delight, Calypso Coral, Granny Apple Green, Pink Pirouette, and Highland Heather Stampin' Blends
Tools - Big Shot (retired), Support Ribbon Framelits, SNAIL, Stampin' Dimensionals

Monday, September 16, 2019

What's new for fall?

Hello and Happy Fall! The weather is finally starting to match the calendar, but we still have some warm days to come. The kids are back in school, fall programs are starting up at church, and there are mums at the grocery stores. And you may not want to think about it yet, but Halloween, Thanksgiving, and Christmas are right around the corner, and I'd like to help you get ready!


First, the Stampin' Up! Holiday Catalog is now live, and the products are amazing! I've added lots of classes to my calendar to give you an opportunity to come and play in my stamping studio. September has gotten away from me, so I'll be kicking off my Christmas Stamp-A-Stack classes in October with 2 sessions in that month, with additional sessions in November and December. You can come to any session and make 12 holiday cards - 4 each of 3 different designs. The cost for each session is $25. By the end of the last meeting, you'll have 48 beautiful handmade holiday cards to send to your family and friends. Easy peasy! The next classes will be held on Monday, October 14 at 7 pm and again on Wednesday, October 16 at 12:30 pm. The second session will be held on Monday, October 28 at 7 pm and Wednesday, October 30 at 12:30 pm. Classes in November and December will be held during the second week of the month. You can come on either Monday or Wednesday for any one or all of the sessions. RSVP for October 14 & 16 is October 4, and RSVP for October 28 & 30 is October 18.


Second, if you'd like to be crafty more often, but don't have time to design or shop, I've got a solution for you -- Paper Pumpkin! It's a fully designed project kit that arrives at your door each month with stamps, ink, and paper -- everything you need to create a simple, fun project! If you sign up by October 10, you'll receive the Winter Wonders kit, which will make 10 full-size cards. The coordinating November kit will contain supplies to make 24 beautiful gift tags of various sizes. You can contact me for more information or go to paperpumpkin.com and sign up yourself. Please choose me as your demonstrator during the registration process or use THIS LINK. I also host an open stamp day each month, so you can bring your kit and get some help if you need it, or get some alternative ideas for your kit.


Third, Stampin' Up! has brought back the popular Designer Series Paper Sale! Through September 30, for every three packages you purchase of select Designer Series Paper, you get one more FREE! Our paper is beautiful and versatile, so don't miss this chance to stock up!

As I mentioned above, the Holiday Catalog is now live and available for you to view at the link on the right, but if you'd like a copy of your own, you can pick one up at an Open Stamp Day or class, or have one mailed to you. There are lots of fabulous products, but availability may be limited, so if you see something you love, don't wait!

As always, you can check the calendar on my website or here on my blog for upcoming events. Project sneak peeks may be posted on my Facebook page. The next Open Stamp Day will be held on Saturday, September 21 from 11 am to 4 pm. RSVP by September 18. 

You can find more information about everything I've mentioned above, and more, at my website, which can be reached by clicking HERE. If you are interested in an event that doesn't fit into your schedule, please let me know so we can make it work for you.

I know this is a busy time of year, and I appreciate you taking the time to read this! Hope to hear from you soon!

--Cindi