Showing posts with label Approaching Perfection. Show all posts

Sunday, September 3, 2023

Belated Happy Birthday

 Hello and welcome back! I've had a bit of a creative block lately so I haven't posted in a couple of weeks. I decided to CASE a couple of cards that I pinned on Pinterest, just to try and catch up on my list. I'm a bit behind on that too. 😐 Anyway, here is today's challenge card:

This is perfect for the "anything goes" challenge at Double Trouble.


I needed a couple of masculine belated birthday cards and this black & white with a pop of color design fits the bill. I love the Azure Afternoon color accent!


The other cards I've made recently were for a batch of anniversary cards using the "stack, slice, and shuffle" technique.


And a birthday card for a young Star Wars fan at my church who shares a birthday with my husband. This one is CASEd directly from Wendy Cranford.

I'm not sure I'd want to make this one again, but it was fun to make once! 

Thanks for stopping by, and happy stamping!

--Cindi


Supplies used for birthday card (all Stampin' Up!):

Stamp sets - Biggest Wish, Well Said, Approaching Perfection (inside sentiment)

Paper - Basic Black, Basic White, Azure Afternoon cardstock; Plaid Tidings DSP

Ink - Memento Tuxedo Black, Azure Afternoon

Tools - Big Shot, Stitched Triangles Dies, Multipurpose Liquid Glue


Supplies used for anniversary cards (all Stampin' Up!):

Stamp set - Beautiful Bouquet

Paper - Basic White Thick Cardstock; Basic White and Bermuda Bay cardstock; Dandy Designs DSP

Ink - Coastal Cabana

Accessories - Iridescent Rhinestones Basic Jewels

Tools - Big Shot, Nested Essentials Dies, Detailed Trio Punch, Multipurpose Liquid Glue, Stampin' Dimensionals


Supplies used for BB-8 card (all Stampin'  Up!):

Stamp set - Best Day

Paper - Basic White, Pumpkin Pie, Smoky Slate, and Basic Black Cardstock; Happy Haunting DSP

Ink - Pumpkin Pie; White Gel Pen

Tools - Big Shot, Layering Circles Dies, Large Numbers Dies, 1" Circle Punch, 1-1/4" Circle Punch, Cookie Cutter Builder Punch, Classic Label Punch, Multipurpose Liquid Glue, Mini Stampin' Dimensionals


Sunday, July 4, 2021

Card of the Day - Medallion Birthday

 Hello and welcome back! Today's card is inspired by the double challenge this week at CAS Colours & Sketches.


Since the colors are retro (retired), I decided to go retro with everything on the card.

The DSP is from International Bazaar, the Pink Pirouette label was cut with the Deco Labels Framelits and embossed with the Garden Trellis embossing folder, the medallion is from the Make a Medallion stamp set, the sentiment is from Teeny Tiny Wishes and the bow is Tangerine Tango Baker's Twine! I think the only thing I used on this card that is still current is the Layering Circles Dies (and of course, the Basic White cardstock).


I think I'll be sending this to my sister for her birthday this month - she's turning 60, so a retro card seems perfect!

Thanks for stopping by, and happy stamping!

--Cindi


Supplies used (all Stampin' Up!):

Stamp sets - Make a Medallion, Teeny Tiny Wishes, Approaching Perfection (inside sentiment)

Paper - Basic White Thick Cardstock; Basic White, Pink Pirouette, and Peach Parfait cardstock; International Bazaar DSP

Ink - Peach Parfait, Pink Pirouette, Tangerine Tango

Accessories - Tangerine Tango Baker's Twine

Tools - Big Shot, Layering Circles Dies, Deco Labels Framelits, Garden Trellis TIEF, Banner Triple Punch, Multipurpose Liquid Glue, Stampin' Dimensionals, Mini Stampin' Dimensionals, Mini Glue Dots

Wednesday, June 30, 2021

CASEing the Catalog - Pretty Perennials

Hello and welcome back! I haven't CASEd a card in a while, so I thought I'd do this one before the catalog is done tonight!

The original version of this card appears on page 31 of the January-June Mini Catalog. I've changed the colors and the details of the sentiment but it's basically the same card. It always makes me nervous to stamp directly on the card front, so I added a layer of Highland Heather under the front panel to make it stand out a bit more.


I added some ink splatter with my Water Painter and Pear Pizzazz ink for a little texture, then pulled out some old Gingham Gala sequins for some bling.


 I couldn't decide which color of ribbon I liked better, so I made one card with each color. Which one do you like most?

Thanks for stopping by, and happy stamping!

--Cindi


Supplies used (all Stampin' Up!):

Stamp sets - Pretty Perennials, Approaching Perfection (inside sentiment)

Paper - Basic White Thick Cardstock; Whisper White, Highland Heather, and Pool Party Cardstocks

Ink - Memento Tuxedo Black, Highland Heather, Pumpkin Pie, Pool Party, Pear Pizzazz, Mossy Meadow

Accessories - Playing With Patterns Ribbon Combo Pack, Gingham Gala Organdy Ribbon Combo Pack, Gingham Gala Adhesive-Backed Sequins

Tools - Big Shot, Tasteful Labels Dies, Water Painters, Multipurpose Liquid Glue, Stampin' Dimensionals, Mini Stampin' Dimensionals, Mini Glue Dots

Saturday, May 15, 2021

Card of the Day - Sweet Soiree Belated Birthday

 Hello and welcome back! I've gotten behind again this month so I needed these to catch up!

This is a pretty simple design but I wanted to take advantage of the many colors in the Designer Series Paper, so I made it in two different colorways. 


I pulled out an old Versamarker from my stash to make the silver embossed strip in the center. I was surprised that it still worked!


I originally planned to just trim out the rectangles but then decided to use my Stitched Rectangles Dies instead. I don't think I'll ever give those up!


This design was inspired by the sketch challenge at Fab Friday.


Well, now I have to start signing and addressing these cards and more. I think I'm going to have about 25 cards going out this week!

Thanks for stopping by, and happy stamping!

--Cindi


Supplies used (all Stampin' Up!):

Stamp sets - Happiest of Birthdays, Approaching Perfection (inside sentiment and envelope)

Paper - Whisper White Thick Cardstock; Whisper White, Calypso Coral, and Berry Burst Cardstock; Sweet Soiree Specialty Designer Series Paper

Ink - Calypso Coral, Berry Burst, Versamarker

Accessories - Silver Embossing Powder

Tools - Big Shot, Stitched Rectangles Dies, Heat Tool, Multipurpose Liquid Glue, Stampin' Dimensionals, Mini Stampin' Dimensionals

Sunday, January 31, 2021

Card of the Day - Senior Years

Hello and welcome back! Today's card is for a friend who's birthday I missed this week - oops!

I've had this stamped and colored image on my work table for a while now, but hadn't decided how to use it. I think it's perfect for this card. I layered it with some flowery DSP and added the gingham ribbon to dress it up.


 I like the subtle detailing on the die cut labels.

This design was inspired by the challenge at Just Add Ink. There are borders on my stamped pieces and a lovely bow! :)

Thanks for stopping by, and have a great day!

--Cindi


Supplies used (all Stampin' Up!):

Stamp sets - Senior Years, Approaching Perfection

Paper - Whisper White Thick Cardstock; Whisper White and Magenta Madness Cardstock; Flowers for Every Season DSP

Ink/Coloring Tools - Memento Tuxedo Black, Magenta Madness; Stampin' Blends: So Saffron Dark, Purple Posy Dark and Light, Basic Black Dark and Light, Smoky Slate Light, Ivory

Accessories - Flowers for Every Season Ribbon Combo Pack

Tools - Big Shot, Hippo & Friends Dies, Lovely Labels Pick a Punch, Multipurpose Liquid Glue, Stampin' Dimensionals

Monday, January 18, 2021

Card of the Day - Color-Blocked Background

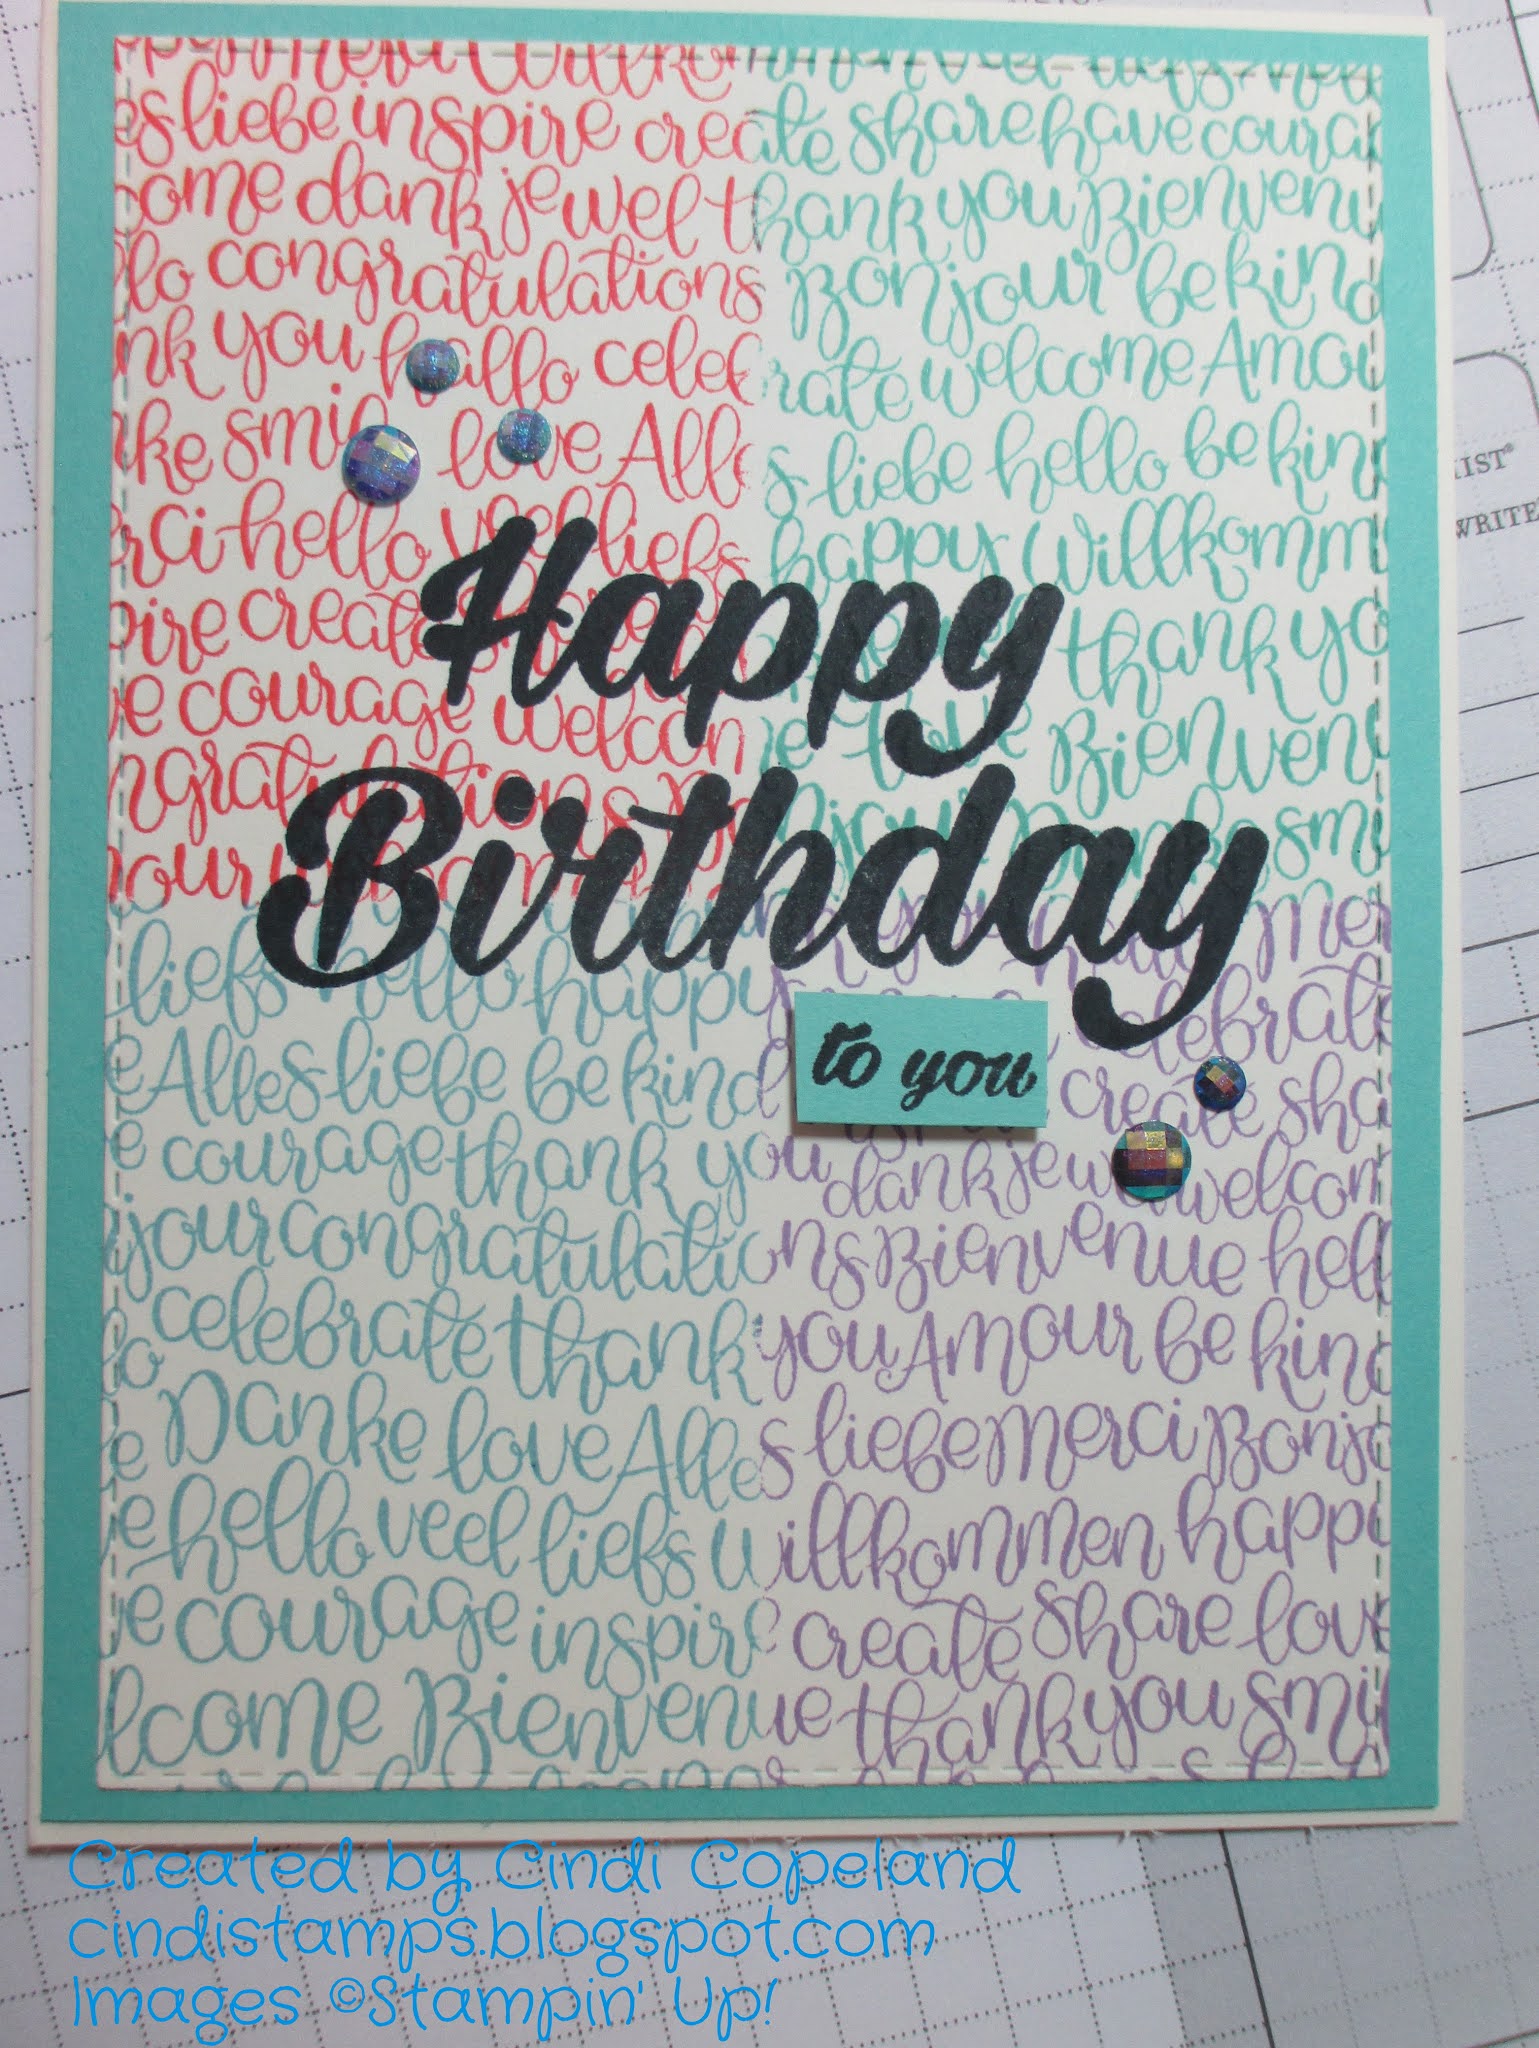
Hello and welcome back! For today's card I decided to try another new technique. I've got lots of photos to explain it (haven't gotten up the nerve to try a video yet!), but first, here's the card.


 I used a background stamp and my Stamparatus to create this color-blocked element. Here are the steps:

1. Cut a piece of cardstock to 4-1/4" x 5-1/2" (a standard card front). Also cut 2 pieces of printer paper to the same dimensions. Then cut each piece of printer paper in half, one horizontally and one vertically.

2. Use a bit of washi tape on the back of the cardstock to hold it down on the Stamparatus platform. Then use more washi to tape down the printer paper, one of the horizontal pieces and one of the vertical pieces. In the photo below, I have already stamped on the right-hand side of the cardstock and am preparing to stamp the left-hand side.


3. Reposition the printer paper to expose one corner of the cardstock at a time. You can see in the photo above that there is a bit of the stamped image exposed. You need to do this because when stamping over the layers, the ink does not get right up to the edge of the printer paper.


4. Here's the stamping on the last corner.


5. You can see in the photo below that there is a small gap between the colors because I didn't position the printer paper with a bit of ink showing. Once the card is finished it won't be as noticeable.


6. I used the largest Stitched Rectangle die to trim the cardstock panel, then used a bold sentiment to stamp over the background in Memento Tuxedo Black.


7. I trimmed a panel of coordinating cardstock to 4-1/8" x 5-3/8" to attach to the card base and trimmed out a small additional stamp for the front. I also added a few adhesive dots for some blingy interest.


I made four of these cards, one with each color. The first one turned out a bit different. Since I wasn't careful about how I placed the masks, there was a much larger gap in the stamping. So I just cut the panel into four pieces to eliminate the stamping gap and adhered them to the colored cardstock. As a result the border is much narrower, but it's hard to tell that it's pieced.


This card was inspired by the product spotlight challenge at TGIF this week.


I hope you'll give this technique a try - it's not too hard at all!

Thanks for stopping by, and have a great day!

--Cindi


Supplies used (all Stampin' Up!):

Stamp sets - Handwritten, Birthday Bright, Approaching Perfection (inside sentiment)

Paper - Very Vanilla Thick Cardstock; Highland Heather, Flirty Flamingo, Balmy Blue, Coastal Cabana, and Very Vanilla Cardstock

Ink - Flirty Flamingo, Balmy Blue, Coastal Cabana, Highland Heather, Memento Tuxedo Black

Accessories - Blue Adhesive-Backed Gems

Tools - Big Shot, Stitched Rectangles Dies, Multipurpose Liquid Glue, Mini Stampin' Dimensionals, Paper Snips